Are you in for Halloween? Whether you�re looking for something scarily sweet to hand out to trick or treaters or something dangerously delicious for your friends and colleagues, these three Halloween desserts are guaranteed to give everyone the spooks… in a good way, of course!
From creepy cupcakes to eerie cookies and terrifying chocolates, these Halloween desserts are so quick and easy to make that you can even get the kids involved. Try them out and have great fun whipping up these treats together!
Click on below for the individual recipes:
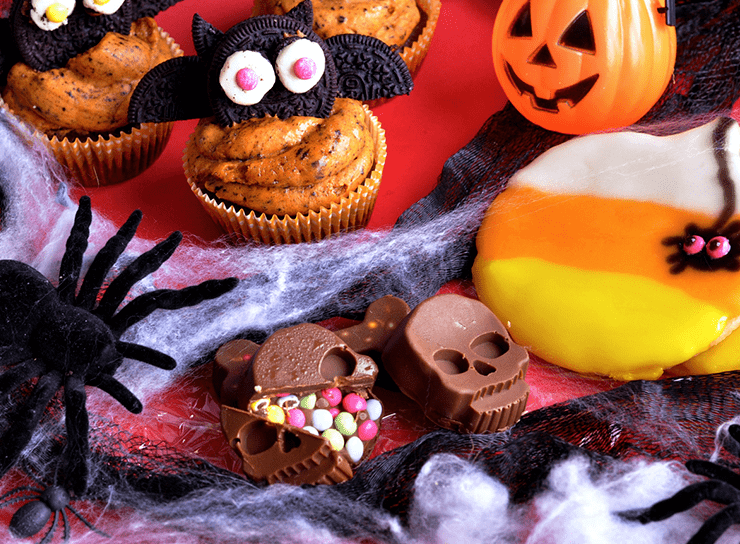
Spooky Bat Cupcakes
Candy Corn Pumpkin Cookies
Surprise Filled Chocolate Bones
Get your baking tools and utensils from Metro, FairPrice Finest and Daiso; and quality ingredients from Cold Storage, NTUC FairPrice and FairPrice Finest.
Spooky Bat Cupcakes
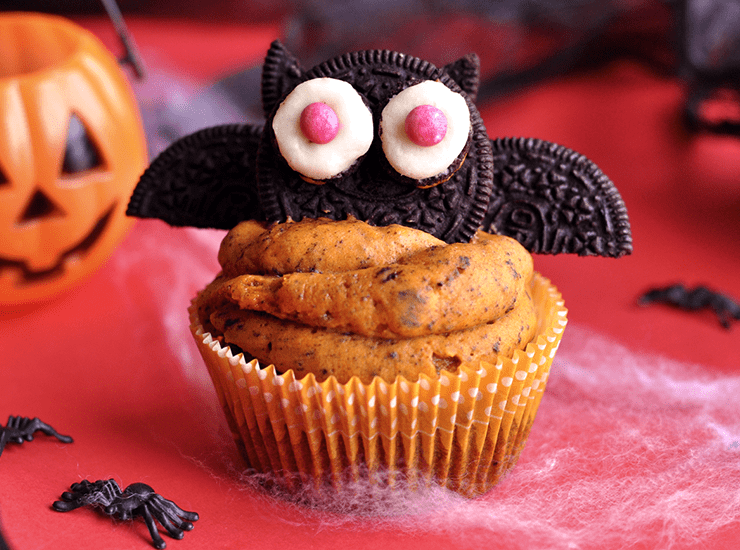
These Spooky Bat Cupcakes are super easy to make, and they look so good people will think you picked them up from a bakery! All you�ll need is a rich chocolate cupcake recipe, yummy cream cheese frosting and a cute Oreo cookie bat topper.
Pro-tip: If you want to keep things as simple as possible, buy pre-made chocolate cupcakes for your base. You can also buy pre-made icing and stir in orange food colouring and crushed Oreo cookies yourself.
What you�ll need
Cupcake liners, muffin tin and a piping bag
Ingredients
Makes 4 cupcakes
For the Cupcakes
- 1 medium egg white
- 40g granulated sugar
- 2 tablespoons butter, melted
- 30g all-purpose flour
- 20g cocoa powder
- ½ teaspoon baking powder
- 50g milk chocolate, finely chopped
For the Frosting
- 30g butter, at room temperature
- 60g cream cheese, at room temperature
- 230g icing sugar
- 3 Oreos
- Orange food colouring
For the Oreo Bat Toppers
- 5 whole Oreos
- 2 Oreos cut in half
- 8 mini Oreos
- 8 small coloured sweets
- Leftover frosting
Put them all together
1. Preheat the oven to 175°C and place 4 cupcake liners inside a muffin tin.
2. In a medium-size bowl, beat the egg white for 2 to 3 minutes with an electric whisk, until soft peaks form. Gently stir in the sugar and butter.
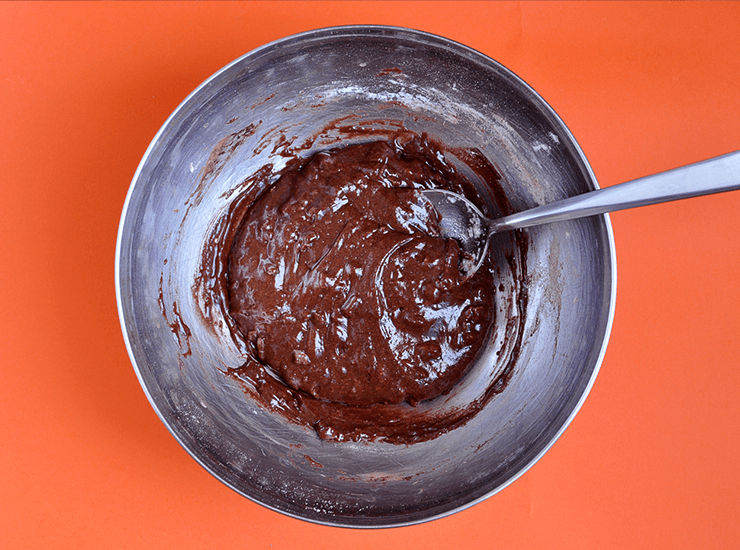
3. Fold in the flour, cocoa powder, baking powder and chocolate and mix until smooth.
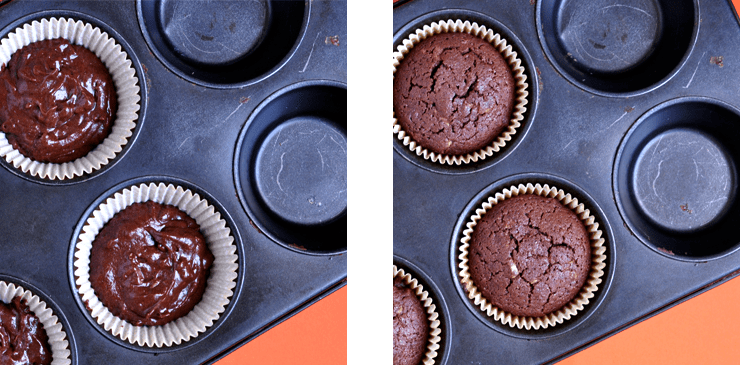
4. Evenly divide the batter between the 4 cupcake liners and bake for 10 minutes, until the tops of the cupcakes are springy to the touch. Leave to cool to room temperature in the muffin tin before decorating.
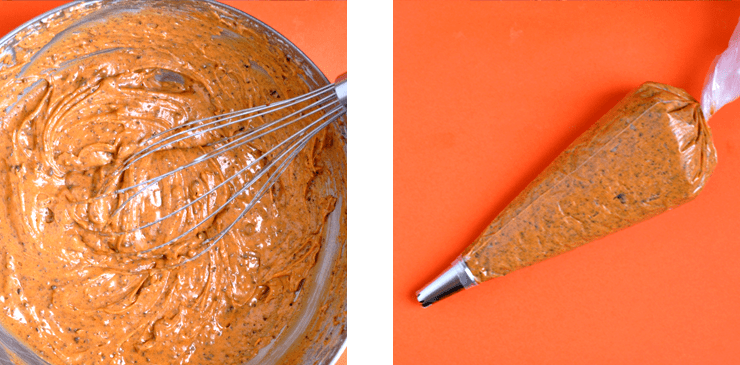
5. Beat the butter and cream cheese together with an electric whisk for 3 to 4 minutes until smooth and fluffy. Add in the icing sugar and beat for another 2 minutes, until thick. Crush the Oreos in a food processor or blender, or chop them finely and stir them into the frosting with a couple drops of orange food colouring. Scoop the frosting into a piping bag and set to one side.
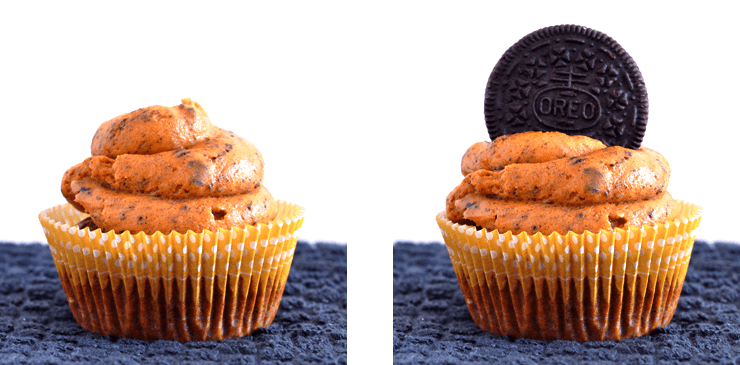
6. Now it�s time to assemble your cupcake! Pipe a generous amount of frosting onto each cupcake. Make sure you don�t use it all up, as you�ll need some frosting later. Place 1 whole Oreo in the centre of each frosting mound for the bat�s face and body.
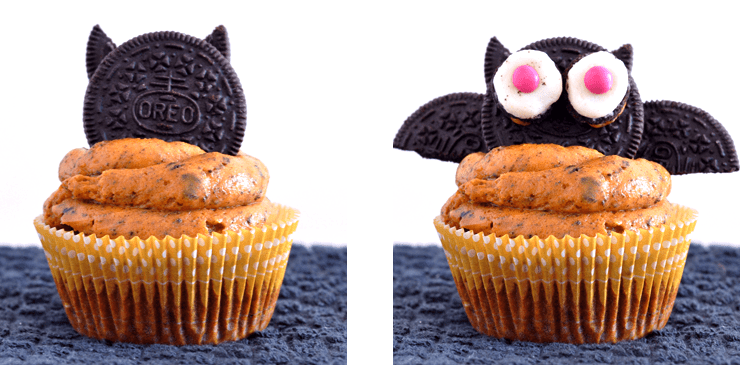
7. Cut some ear shapes out of 1 whole Oreo and stick them onto the back of each bat face with leftover frosting. Slice the mini Oreos in half, gathering all the white cream onto one side of the cookie, and stick them onto the bat face with leftover frosting eyes. Place a small coloured sweet into the centre of each mini Oreo for the iris. Stick 2 Oreo halves using leftover frosting behind the bat face to create the wings.
Candy Corn Pumpkin Cookies
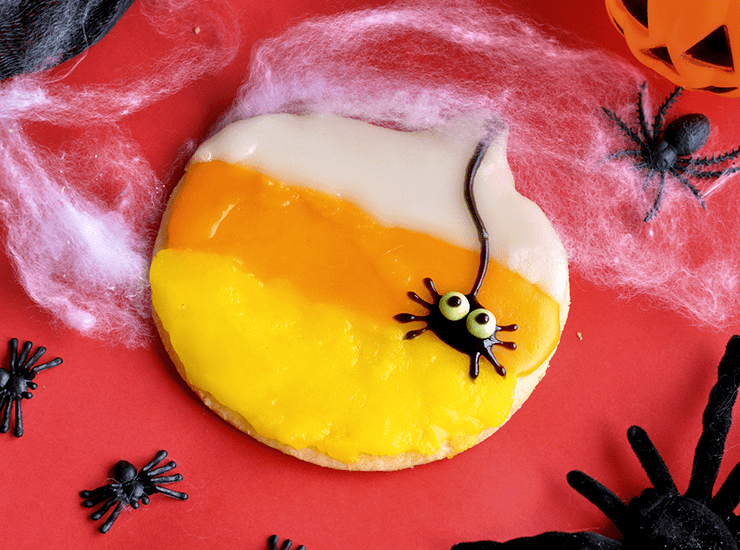
It wouldn�t be Halloween without pumpkins! These wonderfully sweet and buttery cookies are iced with traditional candy corn colours and decorated with creepy spiders.
Pro-tip: Make sure your icing is thick enough to hold its shape when you spread it on the cookies; otherwise if it�s too soft, the icing colours will blend with each together!
What you�ll need
Non-stick baking mat or parchment paper, rolling pin and pumpkin-shaped cookie cutter
Ingredients
Makes 6 large cookies
For the Cookies
- 150g all-purpose flour
- 35g granulated sugar
- 85g butter, cold and cubed
For the Icing
- 300g icing sugar
- 2 tablespoons water
- Orange food colouring
- Yellow food colouring
- Black icing pen
- 12 small coloured sweets
Put them all together
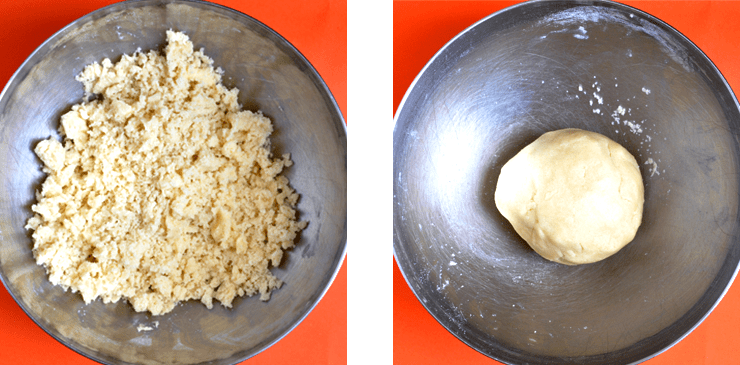
1. In a medium-size bowl, stir together the flour and sugar. Rub in the butter with your fingertips until the mixture has a breadcrumb-like consistency. Tip the mixture out onto a flat, clean surface and knead until a strong, solid dough forms. Leave in the fridge for 10 minutes to chill.
2. Preheat the oven to 160°C and line a baking tray with parchment paper.
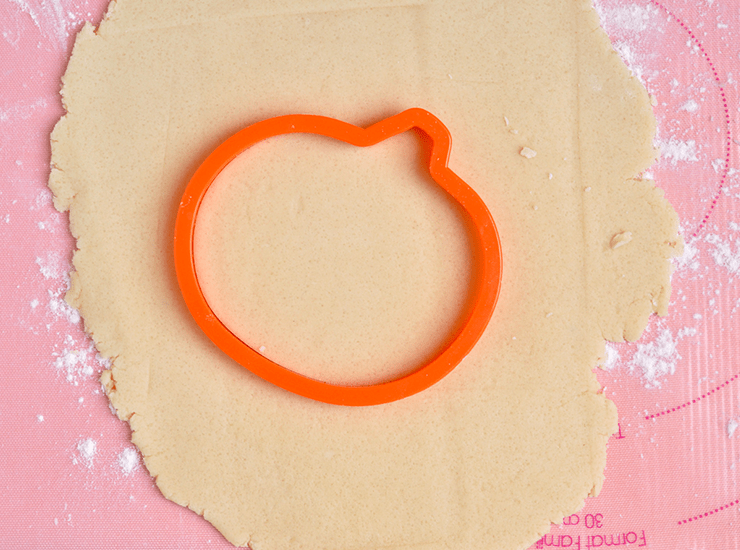
3. On a non-stick mat, use a rolling pin to roll the chilled dough out until it�s about 1cm thick and use a pumpkin cookie cutter to cut out 6 pumpkin shapes. Scrunch leftover dough scraps up together, re-roll them and cut out more cookies until you�ve used up all the dough.

4. Place the pumpkin cookies on the lined baking tray and bake for 10 minutes, until the edges are just starting to turn golden brown. Leave to cool to room temperature on the baking tray before icing.
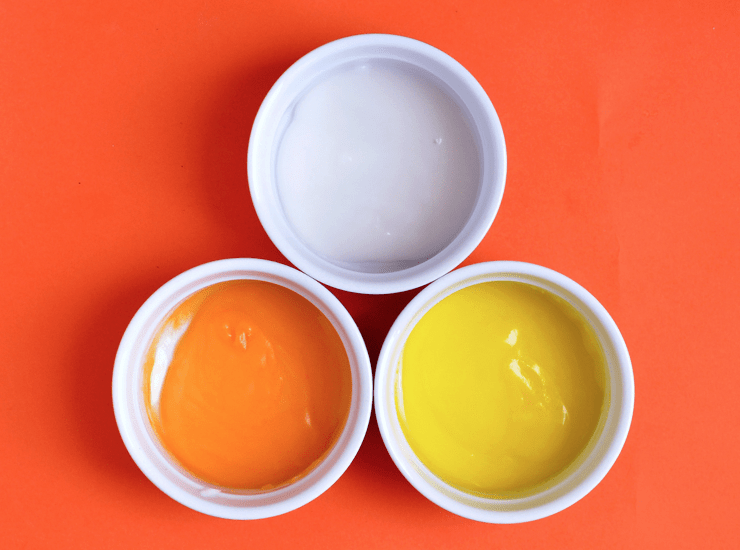
5. Stir the icing sugar together with the water until thick and smooth. Evenly divide the icing between 3 small bowls. Add a couple drops of orange food colouring into one bowl with icing. Add a couple drops of yellow food colouring into another bowl with icing. Stir the food colouring into each bowl of icing until the colour is even.
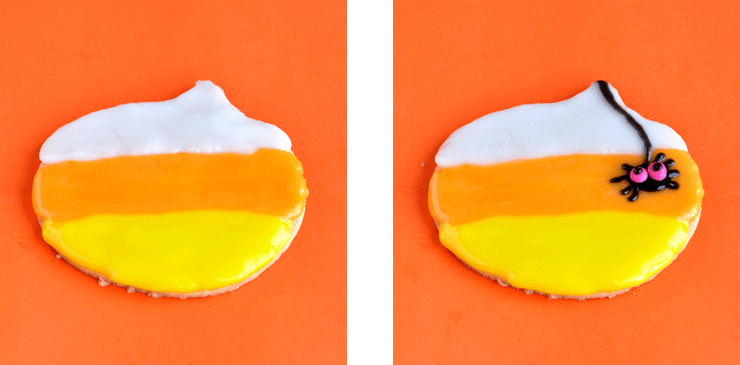
6. To decorate the cookies, use a knife or spoon to spread the bottom 1/3 of each cookie with the yellow icing, the middle 1/3 of each cookie with the orange icing and the top 1/3 of the cookie with white icing. Leave to chill for 10 minutes in the fridge. When chilled, use a black icing pen to draw a spider on each cookie. While the black icing is still wet, add 2 small coloured sweets to each spider for eyes and add a couple of extra black icing dots for pupils.
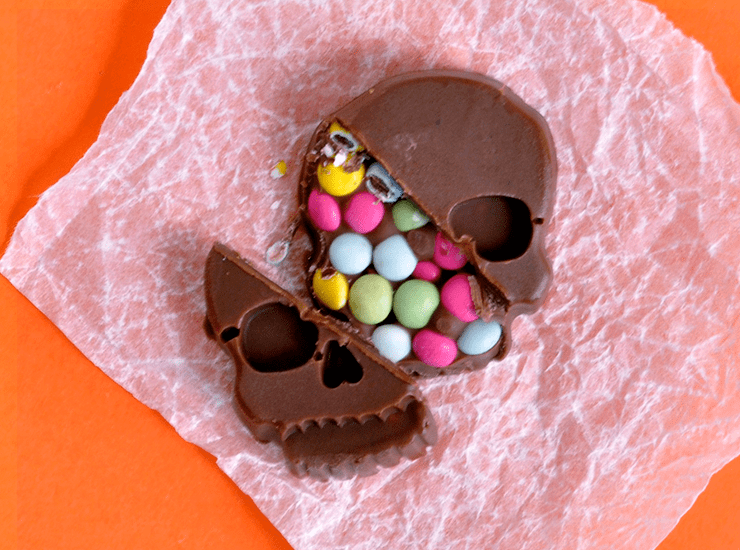
Surprise Filled Chocolate Bones
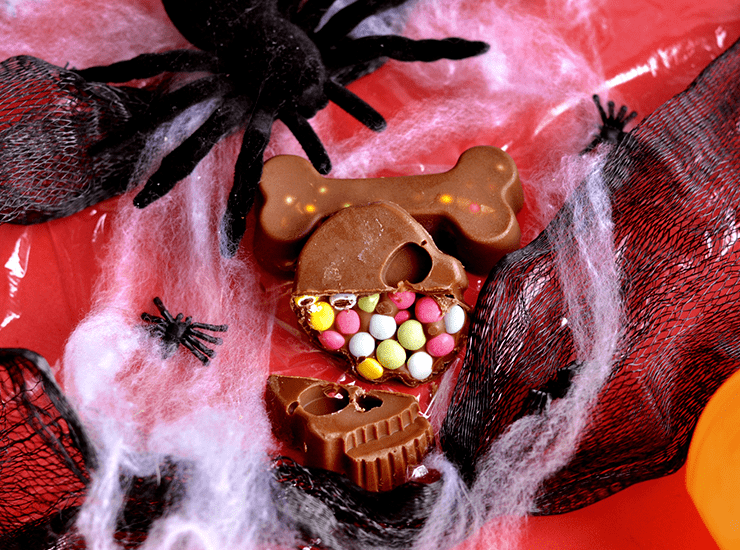
What�s better than chocolates? Chocolates filled with even more chocolates! These Halloween treats are really easy to make and are stuffed full of coloured candies for a nice surprise.
Pro-tip: You don�t have to fill the chocolates with small coloured sweets. You could use nuts, seeds, cereal or even small cookies for a fun and healthy twist.
What you�ll need
Silicone skull and crossbones mould and small pastry brush
Ingredients
Makes around 6 large chocolates
- 150g milk chocolate
- Small coloured sweets
Put them all together
1. Chop up the chocolate and place it into a microwave-safe bowl. Cook in the microwave in 20 second intervals, stirring in between, until completely melted.
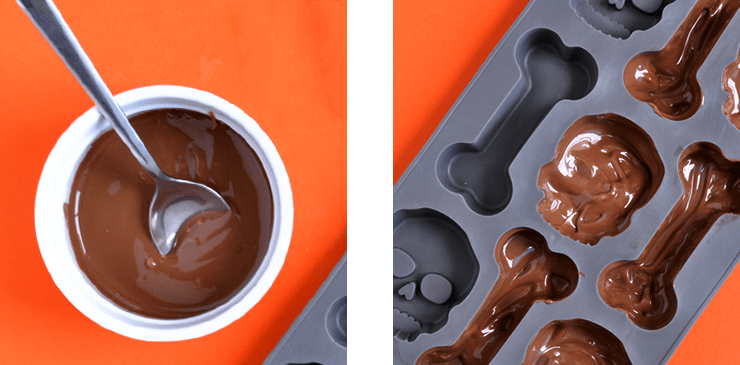
2. Use half the melted chocolate to fill the holes in a skull and crossbones mould. Use a small pastry brush to spread the chocolate into the corners and up the sides, so every bit is covered. Don�t forget to leave room for the surprise! Place in the freezer and leave to set for 10 minutes.
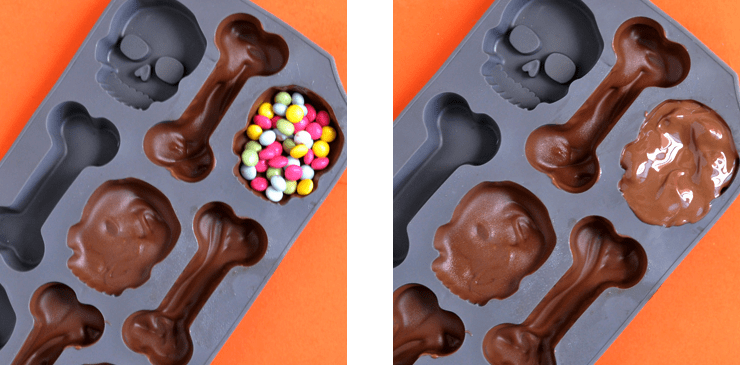
3. When set, fill each mould with small coloured sweets. Pour the remaining melted chocolate into the moulds and spread it out so it covers all the sweets and touches the edges. Leave in the fridge to set for 1 hour before removing from the moulds.
So, whether you�re making these spooky Halloween desserts to give away to some lucky people or just to share amongst your family, friends or colleagues, we hope you have a great time making them together. Happy Halloween!